Tutorials For How To Work

TechnoSurvive is the best Computer Knowledge based Blog. Where you know about computer related problems and solutions. Computer hardware and software problem are describe here. Find your solution here.

Wednesday, January 24, 2018

How to disable windows 10 update setting


This is new feature of windows 10 that it will update windows feature automatically. As a result, we get all feature updated and PC has safe from Virus or harmful software. It's also update our farm-work and security setting automatically that is needed for our updated version of software and killing our error bug.
Disable Windows 10 Update Setting Permanently
Disable Update setting

Who use limited data from modem, it is also expensive for them. This will update hidden and automatically. So they can't sens that their data is charged without any permission till they check their credit amount.
It is also annoying that when you want to turn off your PC because then you can't turn off your PC instant until your update completed. As a result, there are many user want to turn off their windows update setting disable. But it is really so Tuff to find out update disable option.

To stop windows 10 update you need to do this. Just follow this process step by step.


Step 1: Search your search option as "Windows Update"
Step 2: Click to Windows Update settings.
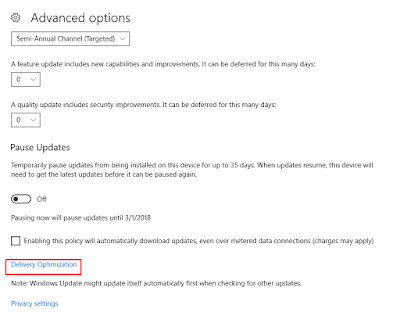
Step 3: Go to Advanced Options
Step 4: Find out and click to "Delivery Optimization"
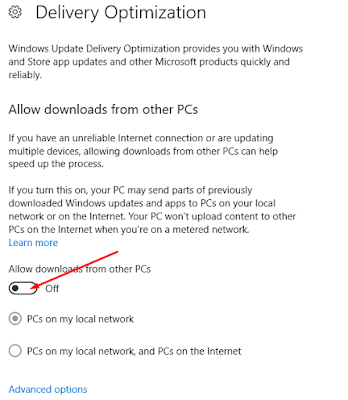
Step 5: Allow download from other option as "off"
 
           Step: 3 Image
Windows Update Permanently for Windows 10
Advance setting
     Step: 4 Delivery Optimization Image
Windows Update Permanently windows 10
Delivery Optimization


Then go to again search option and type "Services"
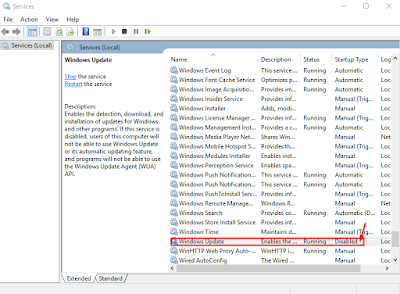
Find out Windows Update option, for shortcut click W button for find it quickly.
Step 1: Double click to "Windows Update"
Step 2: Startup type: Disabled
Step 3: Click "OK"

Screenshot for Disable windows update for windows 10 are given bellow:


            Step 1: Services Image
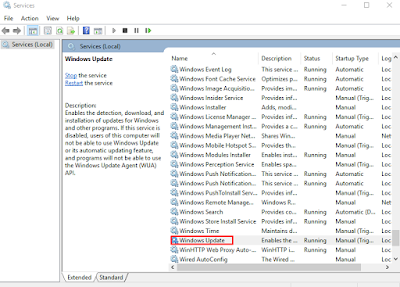

windows 10 update setting
Services Options
                 Step 2: Startup type: Disabled

Disable windows 10 update Permanently
Startup type: Disabled


                 Step : After Disabled 
Disable Windows 10 Update
After Disabled 


-----Done-----

Your windows update is disabled. You have also another post for removing windows 10 active windows watermark.

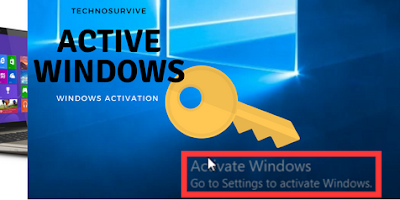
You can also follow the video tutorials step by step:


Saturday, January 20, 2018

How to remove windows activation watermark for windows 7, 8, 8.1, 10


Active your Windows all version. It is fully safe and you can use this without any harmful effect for your system files. You can active your all kinds of windows like Windows 10, Windows 8, Windows 8.1  by following a simply tricks of a windows activation tool. After installing a windows on your PC you show a Windows activation watermark on your right side of your display.

Windows-activation-watermark-remove
Windows activation watermark


It is annoing for you that it could be showing you a black display or it will remove your custom wallpaper that you set on your display. Remove this watermark within 1 minute.

What would you need to remove this watermark for windows?


Step 1: Just download activation tools. If you can't download, just deactivate your windows defender.

Step 2: Install this tools. When installing please disconnecting your internet connection and run as administrator.

Step 3: After installing just restart your computer. Work done that you want.

Now check that your right side watermark removed. You can follow the video step by step that given bellow.


Which versions of windows it works:

►►Windows 10 Professional
►►Windows 10 Enterprise
►►Windows 10 Home

►►Windows 10 Professional N
►►Windows 10 Enterprise N
►►Windows 10 Education
►►Windows 10 Education N
►►Windows 10 Enterprise 2015 LTSB
►►Windows 10 Enterprise 2015 LTSB N
►►Windows 10 Home N            
►►Windows 10 Home Single Language
►►Windows 10 Home Country Specific

►►Windows 8.1 Professional
►►Windows 8.1 Professional Wmc
►►Windows 8.1 Professional_N
►►Windows 8.1 Enterprise
►►Windows 8.1 Enterprise_N
►►Windows 8.1 ProfessionalPreview
►►Windows 8.1 Preview
►►Windows 8.1 CoreARM
►►Windows 8.1 Core
►►Windows 8.1 CoreN
►►Windows 8.1 CoreSingleLanguage
►►Windows 8.1 CoreCountrySpecific
►►Windows 8.1 EmbeddedIndustry
►►Windows 8.1 EmbeddedIndustryE
►►Windows 8.1 EmbeddedIndustryA

►►Windows 8 Professional
►►Windows 8 Professional N
►►Windows 8 Enterprise
►►Windows 8 Enterprise N
►►Windows 8 ProfessionalPreview
►►Windows 8 PreRelease
►►Windows 8 ProfessionalWMC
►►Windows 8 CoreARM
►►Windows 8 Core
►►Windows 8 CoreN
►►Windows 8 CoreSingleLanguage
►►Windows 8 CoreCountrySpecific
►►Windows 8 EmbeddedProfessional
►►Windows 8 EmbeddedEnterprise

►►Windows 7 Professional
►►Windows 7 Professional N
►►Windows 7 Professional E
►►Windows 7 Enterprise
►►Windows 7 Enterprise N
►►Windows 7 Enterprise E

►►Windows12R2Server Standard
►►Windows12R2Server Datacenter
►►Windows12R2Server Standard Core
►►Windows12R2Server Datacenter Core
►►Windows12R2Server Cloud Storage Core
►►Windows12R2Server Cloud Storage
►►Windows12R2Server Solution Core
►►Windows12R2Server Solution

►►Windows12Server Standard
►►Windows12Server Datacenter
►►Windows12Server Standard Core
►►Windows12Server Datacenter Core
►►Windows12Server Core
►►Windows12Server CoreN
►►Windows12Server Multi Point Standard
►►Windows12Server Multi Point Premium

►►Windows Vista Business
►►Windows Vista Business N
►►Windows Vista Enterprise
►►Windows Vista Enterprise N


►►Windows08R2Server Standard
►►Windows08R2Server Enterprise
►►Windows08R2Server Data Center
►►Windows08R2Server HPC
►►Windows08R2Server Web

►►Windows08Server Standard
►►Windows08Server Enterprise
►►Windows08Server Data Center
►►Windows08Server HPC


Requirements:
Net Framework 2.0
Internet Connection (To Update KMS online server for work)

Thursday, January 18, 2018

How to Increase My C drive disk size


Now you can Increase your C: Drive size without setup windows or any software from Disk management. If you think your C Drive is over or you need more space for any big size software installation, you can add more space with C Drive.

Because, Your Local Disk C: is more important for speed Up your computer. Now speed Up your computer by increasing your C: Drive size quickly. Red signal for your windows installed drive is very harmful for your computer. It can damage your PC as well as destroy your important file.

For preventing this just doing this simple work. First go to your control panel and find computer management option or simple search your search option by typing "Disk Management" as a result you found "Create and format hard disk partitions" option.

After finding disk management option you choose your existing drive that your want to add with your C: Drive. I also tell about how to create a new drive to another post. Then deleting your empty space, go to your windows Installation C: Drive.


 Click to your right side of your mouse and then click to Extend Volume option. Follow the process by clicking "Next" till "Select Disks Volume". Now simply type your required file size in MB unit that you want to add.

Example,
You want to add 2GB with your C: Drive

For this,
2GB= 1024*2=2048
For 3GB Space, 3GB=1024*3=3072


Then click "Next" button till show "Finish". When Show finish option, your think that your your is 99.99% done and then click to Finish option, Your work is 100% done.

Your windows C: Drive is increased finally.

OR, You can follow the video step by step.

Wednesday, January 17, 2018


How to Create a new Drive form My Partition Without Formatting | TechnoSurvive


You can make a new drive to existing volume by watching this video. For making a new drive first you need to search by typing disk management or you can get this from control panel option.

After searching disk management you get create  and format hard disk partitions. You would choose your existing drive where you thing that a maximum empty size are existing for making new drive.
Choose a drive and click right button then you will get shrink volume option and you get message like video. Where you need to select your drive size less than existing drive size.

Example:  You want to make 2GB drive size for your documents
as a result Enter the amount of space to shrink in MB
1024*2=2048
For 3GR size

1024*3=3072


Then Click to Shrink option. You get an Unallocated drive. For activating this drive again click mouse right button and then click to "New Simple Volume" and Click Next option for complete your process. Where you get chance to Rename or choose drive name option or you can change it later.

When completed your process you finally get a new hard drive that you want.
Just follow the video step by step, You can make a Hard drive volume without any losse, formate or delete your of Important files. Work Done. Just Cool.

Thanks.